homage style

when your home is your canvas

schedule a design consult
  • blog
  • services
    • styling & decorating
    • home staging
    • virtual home staging
  • featured
  • about
  • workshops
  • contact
  • subscribe

tea time

15 January 2013 by Andrea Leave a Comment

Would you please pour me a cup of tea?

Tea pot 1

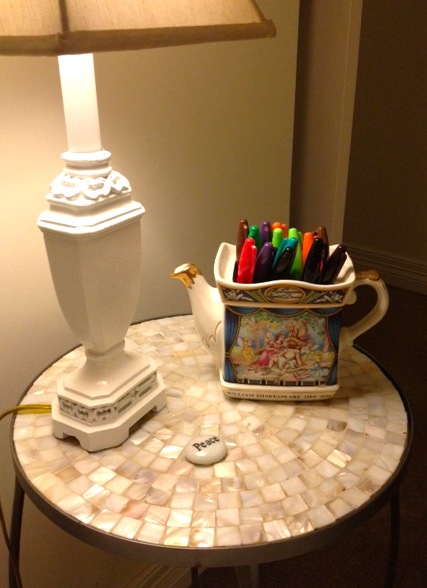
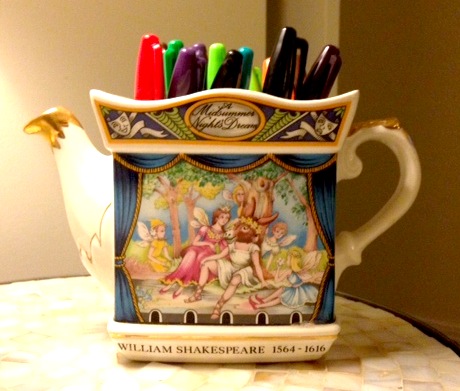
Oh wait. Something’s off. Looks like someone put Sharpies in the teapot.

Oh yeah. That was me. Because I love to use things for purposes other than their original intent. Like Sharpies in a funky Midsummer Night’s Dream teapot.

Clever, too, since I wasn’t serving up tea very often.

tea pot 2


It’s cute, don’t you think?


little things – bracelet edition

6 January 2013 by Andrea 2 Comments

This is a broken vintage bracelet…

bracelet1

This is a broken vintage bracelet used as art…

bracelet2

Pretty clever, huh?

As much as I would love to wear this bracelet, there was no fixing it, because the metal wasn’t strong enough to repair. But I still love the vibrant colors and beautiful design, so on the wall it went.

bracelet3

Works perfectly next to my print of First Kiss by Bouguereau, which I bought at Target a number of years back for $3.78. Can’t remember what I ate for breakfast today, but can remember how much I paid for something clearance 10 years ago! Go figure.

bracelet4

Yeah, it’s the little things, people…

Showing off this project at Funky Junk Interiors.

little things :: recorder edition

5 September 2012 by Andrea Leave a Comment

If you have kids or ever were a kid, I’m betting that you have an old recorder lying around. Didn’t everyone play recorder in school? I know I did, my sister did, and both of my kids did.

And I’m guessing that you also have some weird little strip of wall that is too small for just about anything decorative. Well, guess again, people!

Dig up that old recorder make it sing again!

No, you don’t have to play Lightly Row…just find an awkward spot and hang that recorder up, just like this…

It’s just a tiny little speck of wall between two door frames. Perfect for a recorder! Don’t you think?

How much did it cost? $0, since I had not one but two recorders hanging around. And if you want to get all funky and colorful, you could spend about $5 and get one of these…

Now go play Lightly Row while you’re looking for a place to hang your recorder!

choosing an accent color

26 August 2012 by Andrea Leave a Comment

Recently I freshened up my family room by adding some simple accessories and not spending scads of money. My new accent colors are orange, yellow, and a vibrant green.

I chose those colors by taking a look at some of the accessories I already had in the room (that I knew I’d be keeping) and picking out some of the more vibrant colors, like the orange and yellow in this lamp shade (which has a great story behind it)…

The spicy pumpkin orange and greens in this chair…

The golden lamp…

The yellow in this vintage advertising art…

And the vibrant yellow lemon zest in the poodle’s martini…(and what poodle doesn’t deserve – hell, even demand – a martini?)…

All pieces that I already had in my family room that either I love (the art and the striped lampshade) or that need to stay because the lotto fairies didn’t leave me a winning ticket (the 90s chairs). Bottom line…I built an entirely new look based on what I already had with just a couple of colors that are now here…

and here…

Plus, just to keep everyone on their toes with a little design surprise, I didn’t just stick to orange, yellow, and green, but also added in a little zebra and black and white…

…because doesn’t black and white zebra match just about anything? Just shake your head yes and agree with me and no one will get hurt!

See it all pulled together in the family room here.

obstacles

8 August 2012 by Andrea Leave a Comment

We all have obstacles to contend with, whether it’s in our design projects or just life in general. It doesn’t matter how experienced you are or how big or small your budget is, you will face obstacles.

I discovered an obstacle the other day when I tried to fix my bed…

Here are some design obstacles that I can think of off the top of my head…

  • Little or no money
  • Project fails
  • Not enough time, due to a job, kids, or other obligations
  • Health concerns
  • Planning an eventual move
  • Lack of consensus on design plan with significant other
  • No inspiration
  • Fear
  • Any combination or all of the above

There are probably countless other obstacles that can prevent one from making a house a home. The question is, do you want to make changes to your home?

If the answer is yes, then the obstacles can be overcome. But on your terms. In your own time.

Don’t feel pressured to be like anyone else.  No one but you truly understands the obstacles you’re facing.  Don’t let those obstacles prevent you from making your creative dreams come true. Sometimes we need to release ourselves from expectations – the way that others think things should be or the timeline they try to impose on you, or even expecting too much of ourselves.

Little or no money

Get resoureceful! I’m not ashamed to have limited funds and you shouldn’t be either! There are plenty of freebies or cheap options out there.

Consider these…

  • Scanning your neighbors’ trash, or as it’s known in trendy design circles – Dumpster Diving! You know the old saw…one man’s trash is another man’s treasure. Put it to good work! One of my favorite pieces is my zebra ottoman, which I pulled out of a neighbor’s trash pile and revamped to fabulousity!
  • Accepting hand-me-downs – Sure your mother-in-law’s chair might be super-frumpy, but recovering it with your fave fabric will make it frumpilicious!
  • Shop Goodwill and other local thrift shops – Never know what you can find!
  • Repurpose to create new things, like I did to make this “plant stand“.
  • And never forget how inexpensive spray paint and wall paint are. Save your pennies and splurge on the paint, which can make the crappiest tchotchke look awesome!

Project fails

All I can say about this is plenty of my projects are failures. I guess that’s how we learn. Don’t know if you’ve noticed, but it seems that a lot more design shows are beginning to share the inner workings of how they put together their designs and how they stage rooms, and many are now also sharing project snafus. That’s refreshing. Because if even the big-time pros with a design staff have an occasional project fail, then why wouldn’t you and I?

My thought on project fails is learn from it and move on.

Not enough time

Yes, we live in a busy, busy world, where sometimes it feels like our lives aren’t our own. A 24/7 place where we’re always connected, companies suck up more and more of our personal lives, kids are overscheduled, and we’re generally encouraged to go, go, go.

I get it. I live it. But somehow we have to steal some time back to make our nests a place of calm respite. To make them a place we love to be. Our favorite place in the whole world.

I don’t know how to tell you how to make that happen, other than to say that we need to get comfy with doing things in small increments of time and maybe not finishing the project today. I am the Grand Pubah of Unfinished Projects, the Queen of Curing, but eventually the important stuff rises to the top of the heap.

Learn to pick the important stuff off the top of the heap. Eventually, your vision will be realized. Besides, design is an always-changing, ever-moving target, right?

Health concerns

There are plenty of people out there, quietly suffering with health issues that can zap their energy and ability to start or finish projects. Even if they have amazing ideas, they may not be able to bring their ideas to life.

If you have a health issue that slows your dreams, just do what you can when you can.  I have struggled with this too, and often wonder if I’ll ever get my old energy levels back.  Perhaps not.  But I’m not going to let it stop me.  Does it slow me and my progress down?  For sure.  But I just keep on trucking, sometimes moving at a snail’s pace, but always continuing to dream about my future projects, and I hope you will too.

Planning an eventual move

Yeah, you’re busted. Just because you’re planning to move in 6 months or a year or ten years, doesn’t mean you’re off the hook for feathering your nest.

You have two choices. You can leave your place bland and impersonal because you might be moving eventually, or you can make it into a place that you love, starting today!

Lack of consensus on design plan

It’s called compromise, baby.

No, I don’t mean the kind of compromise that we both decide to like my ideas always. (Although wouldn’t that be awesome?)

If you and your signif other can’t agree on one project, I’m guessing that there are plenty more projects to start on that you do agree on. Move on to something different and come back to this one later. Maybe one or both of you will have a change of heart or your overall vision will change.

If that doesn’t work, there’s always couples counseling.

No inspiration

Can you say Pinterest? With Pinterest and all of the design blogs out there, none of us have any excuse not to get inspired.

Don’t have ideas? Then copy someone else’s and apply them to your space. Eventually, you’ll get inspired with your own ideas or offshoots of others’ ideas. Go for it!

Fear

We’re all afraid to some degree. What if it doesn’t work out? Then you’ll learn from your failure (see Project Fails above) and move on and try again. If you’re really fearful, start small. Something small and inexpensive isn’t going to destroy your world if it goes wrong. But if it goes right, it may just rock your world! So…

Just Do It!

The message here is to do what you can, when you can. Let yourself off the hook if you don’t work at the same pace as others. Forgive yourself and get comfortable with who you are and your obstacles won’t seem like such difficult problems to overcome.  They’ll eventually become part of the terrain that is your life to navigate. Don’t worry, you’ll be great!

little things :: work cubicle edition

10 March 2012 by Andrea Leave a Comment

For those of us who work full time outside the home, we spend more waking hours there than in the homes we love with the family we love.

OK, now that I’ve depressed you, let me at least encourage you to do something to spruce up your cubicle space.

Nothing as extravagant as you’ll find here…

Maybe something a little more subtle…

One of the ways to soften the harsh edges of a cubicle and give your workspace some life is with a plant. Here’s a plant that I’ve had at my desk…

Just your basic succulent.  (I can’t handle plants that need any more care than very infrequent watering, hence the succulent.)

Then one day we were cleaning out our supply of old versions of dictionaries and style manuals.  I work as an editor, so we need to work with the most up-to-date versions. The books were going to be tossed in the recycle bin, so I decided to give them new life and add some height to my plant…

Use what you have decorating at its finest! Now it’s just a little thing, but it’s really spruced up my plant and my desk!  You can add a little design just about anywhere with a stack of books.  And no need to pay lots of cash for this one…check out the dumpster, the recycle bin, your bookshelf, or the library book sale.

Here are a couple of other tchotchkes that I use to personalize my cubicle space…

Because I love me some letters and numbers, I *had* to own this lamp when I saw it on clearance at Kohl’s a couple years back.

And this sweet thing from my monkey collection…

Just a couple of things to make my cubicle to seem less sterile and more fun!

Have you done anything fun to brighten up your workplace?  Share your pics on the Homage Style Facebook page.

And don’t forget to enter the Spring Cleaning Giveaway for a chance to win this adorable sterling silver charm bracelet!

Click here for contest entry details.

Showing off at…

ottoman before & after

8 January 2012 by Andrea 11 Comments

About a year ago, I found this ottoman in my neighbor’s trash…

It was in pretty bad shape, but sturdy nonetheless…

Obviously trash picked, since there was even garbage in the springs…

Gross, but salvagable!

So, I let it cure in my garage for a year.

Eventually I picked up some zebra faux fur, which I bought from Joann, using a 50% off coupon from the Joann app on my iPhone. I bought a yard and a half, which cost me around $12 with the coupon.

This weekend the moment of inspiration finally struck!

I already had high gloss black spray paint, so I cleaned up the ottoman and spray painted the legs.

I didn’t worry a whole lot about getting paint on the original fabric, since the faux fur is thick enough to cover any discoloration.

The legs weren’t looking too bad…

It’s amazing how much of a difference just the black paint makes.

And now for the faux fur…

I began by stapling the prewashed fabric in the middle of the wider side of the ottoman.

As an aside, if you’re in the market for a staple gun, let me recommend that you consider an electric staple gun.  They’re just a couple bucks more than a manual one, and totally worth it, because the electric one won’t kill your hands the way a manual one does. It’s still a workout and you’ll still break a sweat, because you need to press firmly to release the safety and you’ll need to pull the fabric taut as well. But overall, it’s much easier to use.

After stapling several places in the middle, I stretched the fabric taut and stapled similarly on the opposite side.

I stapled my way out from the middle, and then did the same on the shorter sides of the ottoman, working my way to the corners.

When I got to the corners, I folded them like I was wrapping a present, tucking them in and under as flat and tight as possible.

So that it looked like this on the side after stapling…

And like this underneath…

I wasn’t terribly concerned about how things looked underneath, just as long as it looked good on the visible surface. And I think it turned out looking pretty darn good!

Isn’t it adorable?  I love it!

Best of all, it was a super inexpensive project.  Only cost me $12 for the fabric, plus the spray paint I already had on hand (approx. $4), and my time an effort.  Can’t beat that!

I’m not sure if I’ll keep the ottoman with the red and orange chair, since they’re both pretty bold, but the combination is growing on me, and boy do I love the zebra faux fur ottoman!

Would you keep the chair and the ottoman together?

Showing off my new ottoman at Funky Junk Interiors and Kammy’s Korner. And jumping into the contest over here…


vintage gym baskets

8 July 2011 by Andrea Leave a Comment

A while back I bought 3 vintage gym baskets from EveryEskimo a seller on Etsy, who has great vintage treasures.

I’ve always liked the cool look of vintage gym baskets, even though I wasn’t much of an athlete back in school…I class-clowned my way through gym class!

They weren’t particularly inexpensive – in fact they were costly – but I was very attached to these because they were from Republic Steel in Canton, Ohio.

I come from a long line of steelworkers, several of whom worked for Republic Steel in the Massillon-Canton area, and I didn’t know if I’d ever come across gym baskets with a personal connection again, so I sprang for them.

This project cured for at least a year, but I knew what I wanted to do with these the whole time.  My goal was to hang these in the kids’ bathroom to store towels & toilet paper.

So I drilled a couple of holes in my newly painted bathroom wall…a risk for sure, just in case this project didn’t work as planned, since I was ruining a perfectly painted wall. (In case you’re not familiar with various literary devices, this, my friends, is foreshadowing.)

Apparently there are absolutely no studs in my bathroom wall, or at least none where I needed them, so I used anchors to attach the screws and washers that would attach the basket to the wall.

FAIL.

Every time I’d tighten the screw close enough to hold the basket to the wall, the anchor would pull out from the wall. Plus, if I left enough room between the baskets to actually reach in & get the towels or TP out of the basket, the top basket would be at average adult eye level.  Perfect for hitting heads and knocking already not secured baskets out of the wall.

PROJECT FAIL.

Yeah, so that was a disappointment after curing and planning for a solid year.

Back to the drawing board.  I patched the newly painted wall (so sad) and I brainstormed.

Since the baskets are just shy of 12″ x 12″, I realized that what I needed was a stackable cube-type system, and I could use the baskets as the drawers.  So I ran out to Target and bought this ClosetMaid 3-shelf stackable organizer…

I put it together & voila!  A viable solution…

It’s not an ideal solution for a couple of reasons, but it will do the trick for now.  First, the middle shelves are adjustable, so they move when I pull the drawers out.  And the baskets fit pretty tightly and will eventually mark up the white laminate.  But for $20, I solved the problem and got the vintage gym baskets out of curing mode and into action.

Maybe someday I’ll go all Ana White on you guys and make my own cube shelving system.  But until then, this works.

(Keeping it real with the toilet brush in the pic!)

Showing off at Funky Junk Interiors Saturday Night Special and Remodelaholic link parties and…


and…

lookee what i found!

10 June 2011 by Andrea 1 Comment

Lookee what I found on Craigslist for 30 clams!


A beautiful chandelier that I’m going to paint and put in my bedroom.  (That is after it “cures” for a while in my garage with my other projects-in-waiting.)

Can’t decide…white, black or other?

Don’t want it to be too shabby chic.  We’ll see…

Edited to add: My friend Claire says silver.  BRILLIANT!  Silver shall be.  (After adequate curing time, of course.)

there’s a bird in my purse – tutorial

2 April 2011 by Andrea Leave a Comment

As you may know, I have a bird problem. So, in the event that you have a bird problem too, I thought I’d show you how to get a bird to nest in a vintage purse.

You will need the following supplies:

  • Vintage purse
  • Floral foam
  • Spanish moss
  • Floral pins (optional)
  • Decorative bird’s nest
  • Decorative bird’s eggs
  • Decorative bird
  • A couple of feathers
  • Hot glue gun

First order of business, find a vintage purse.  Check your local Goodwill, thrift store, or garage sale.

Then take some floral foam and cut it to fit inside the purse.

No need to use special tools to cut the foam.  Basic scissors will do.  And take note…cutting the foam is not a tidy job.  You will need to vacuum after this project.

Then insert the foam into the purse.

Next step is to cover the foam with the Spanish moss.

You can secure the moss with floral pins.

Next step is the nest.  A nest from a craft store may have wire prongs.  Position the nest where you want it in the purse and push the prongs through the moss and into the floral foam.  If the nest doesn’t have prongs, you can use floral pins to secure it.

When the nest is secure, hot glue several eggs in the nest.

Place your bird in the nest.  Your bird may have wires in the legs.  If so, you can use them to secure the bird in the floral foam.

However, if you’re placing your bird in the nest, the wire may be too flimsy to poke through the nest.  In that case, clip the wires and hot glue the bird in place in the nest or purse.

If your purse has a pocket, you can hot glue a couple of feathers in the pocket.  And voila!  A bird has nested in your purse!

I made this purse for my friend Claire, whose house I featured in a recent Road Trip.  Since Claire has lots of blue in her house – from sky blue to Tiffany blue – and plenty of red accents, I thought this would be a perfect gift for her (although I did ask her in advance if she was afraid of birds, since some people are, like my sister).  The good news is she loved it!

Showing off my bird problem at Funky Junk Interiors and Remodelaholic…

Funky Junk's Sat Nite Special

Remodelaholic

Next Page »
  • Email
  • Facebook
  • Instagram
  • Pinterest
  • Twitter

subscribe, baby!

Homage Style on Twitter
Homage Style on Facebook
Pin me! Homage Style on Pinterest

archives

WORK IN PROGRESS...

work in progress :: rose painting

FAVORITE PROJECTS...

the tornado lounge

another glorious chalkboard project

freshening up the family room

industrial chic curtains

angsty teen boy's room

almost instant art

vintage cowboy room

Copyright © 2025 · Beautiful Pro Theme on Genesis Framework · WordPress · Log in