homage style

when your home is your canvas

schedule a design consult
  • blog
  • services
    • styling & decorating
    • home staging
    • virtual home staging
  • featured
  • about
  • workshops
  • contact
  • subscribe

black angels

1 September 2013 by Andrea Leave a Comment

photo 9b

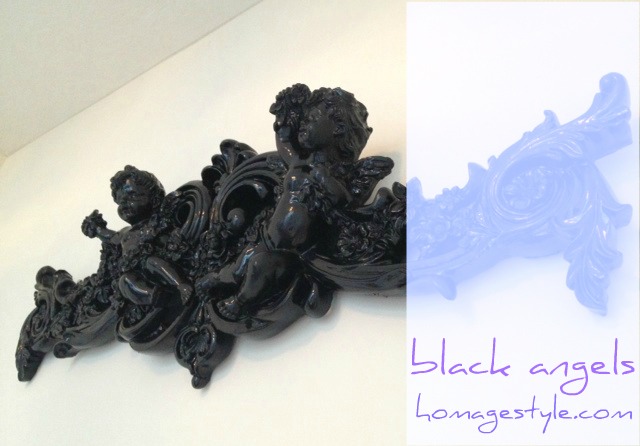
Perhaps it reflects the blackness of my soul, but I find something so alluring about high gloss black angels.

So in the spirit of attending to the blackness of my soul, this weekend I decided to finish curing yet another project…the black angels project.

Honestly people, this project has been curing in my garage for probably seven years. Rather than judging me and thinking what a lazy human being I must be, consider it a personal favor to you. Doesn’t it make you feel better about yourself to know that there’s someone out there far lazier than you? And besides, if I can start and finish a project after it’s cured for seven years, hell, you can do just about anything you put your mind to!

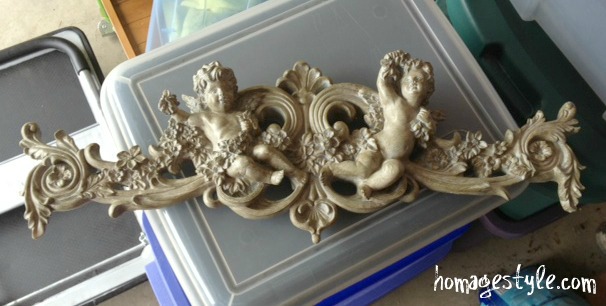
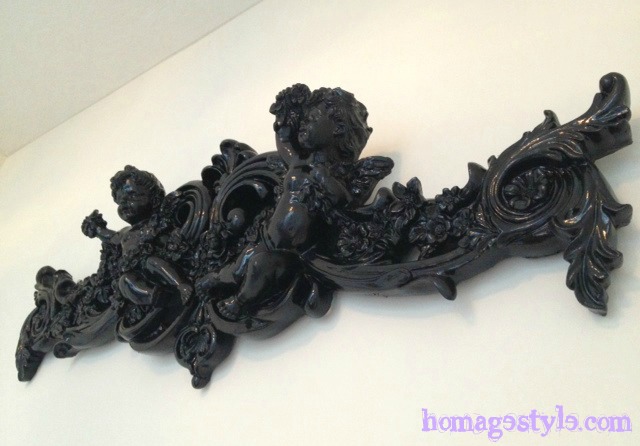
The black angels started their life as an underwhelming resin wall hanging…

photo 2a

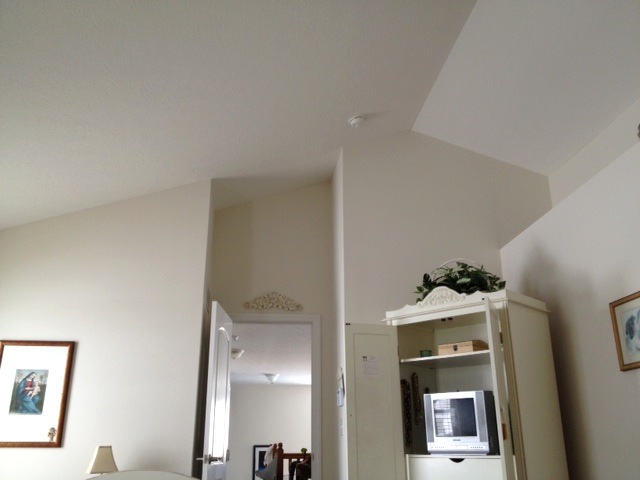
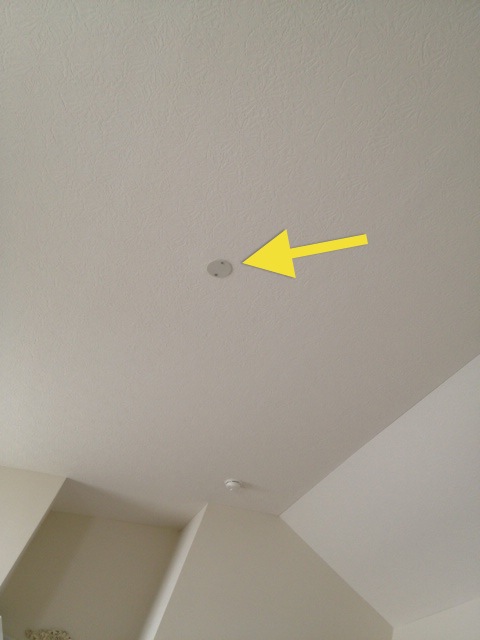
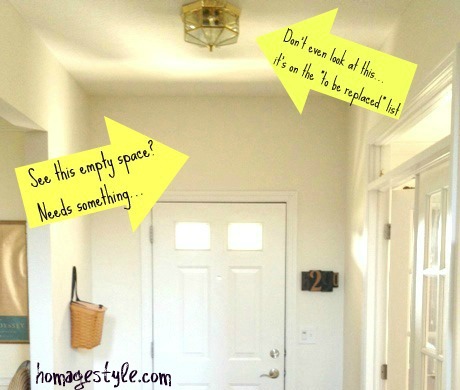
This spot over my front door needed a little something…

photo 1a

It’s bland…very bland…

photo 1b

So I took the basic resin angel wall hanging…

photo 3a

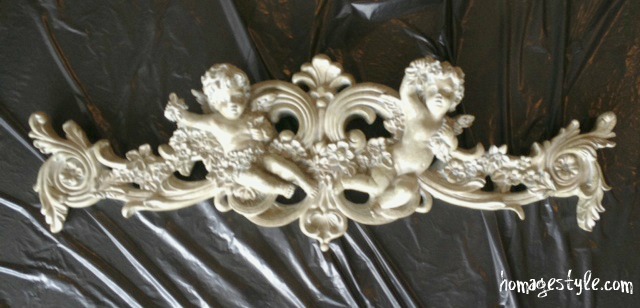
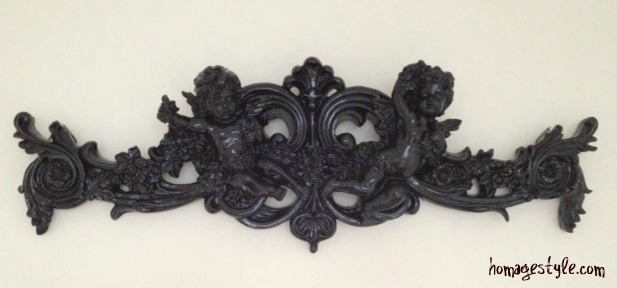
…tossed it on a lawn bag in my garage and started spray painting with a high gloss black. It only took 2 coats, so it was quick and easy, plus it didn’t cost me one red cent, because I already had the spray paint (and you are aware that I’ve had the damn resin thing lingering around for years).

And before you know it, it was a reflection of the high glossy blackness of my soul…there…now, isn’t that better?

photo 5a

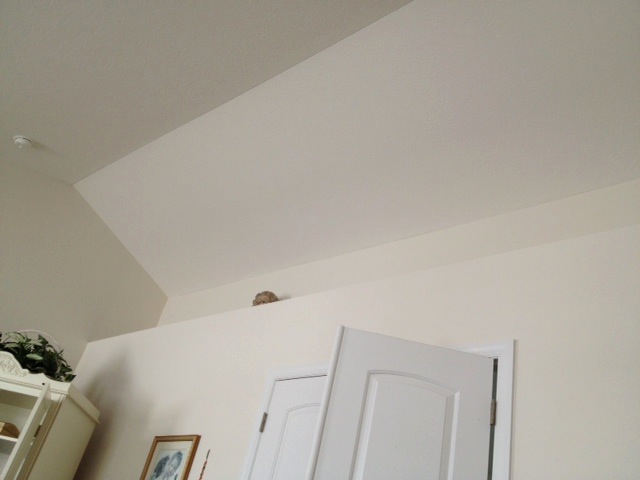
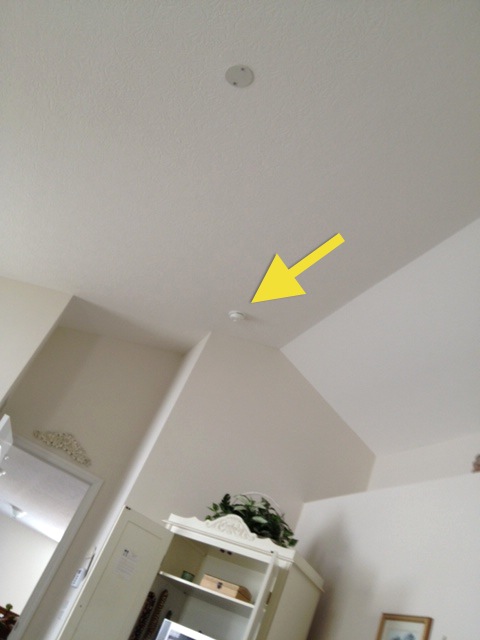
Here it is above the front door…

photo 6a

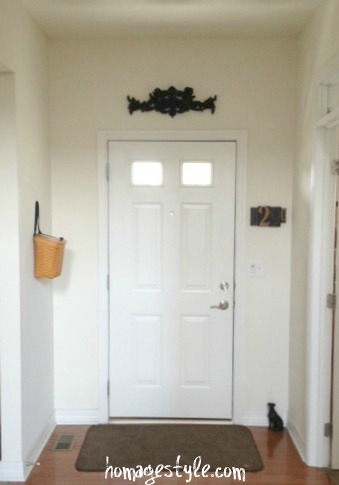
You don’t get the full effect from afar, plus the area still needs to much more work (paint on the walls, the door painted black, board and batten all around – I have big plans, people), but you get the idea.

Another close-up…

photo 10a

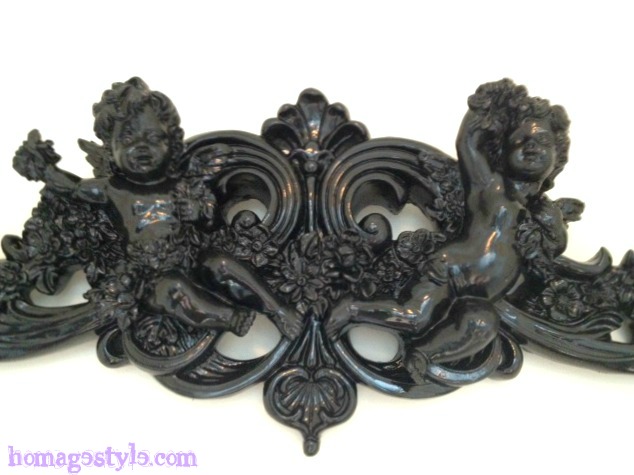
And the angels from another angle…

photo 9a

Gloriousness!

Thank goodness I felt like letting the high gloss blackness of my soul come out this weekend. I just love how these glorious black angels turned out!

Showing off at Funky Junk Interiors.

road trip :: nyc edition

21 August 2013 by Andrea Leave a Comment

Empire State BuildingView of the Empire State Building from my hotel room

This past week I spent some time in New York City for work. Stayed at the Element on West 39th between 8th and 9th, an “eco-chic” hotel with fabulous green design. Here’s how they describe their eco-chi-chi-ness:

Created to be an oasis of natural light, experience a new kind of NYC hotel with Element New York Times Square West.

With space to live your life, our eco-friendly New York City hotel is fully devoted to helping the environment.  Floors feature carpets made from 100% recycled content. Artwork is mounted on bases made from recycled tires.  Low VOC (volatile organic compounds) paints improve indoor air quality for guests and team members.  In the bathroom guests can choose between a half or full flush and wash up in our low-flow sink faucet.

Not a bad place to stay, all in all, especially for New York.

NYC daylightView from my hotel during the day

Thought I’d share a couple of my fave design elements…

Elements sink

The sink! God, how I loved this sink! So simple, yet so cool! I completely and totally covet this sink! And so much nicer to use than a traditional oval basin – so wide and open. My only complaint would be that I would have liked more counter space, but I was in New York City after all, where space is a luxury.

I probably would have enjoyed the sink even more if the faucet were properly affixed, not leaving a space large enough for a giant sewer rat to climb up and kill me in the night…

Elements faucetRats are notorious for climbing through small spaces

Fortunately, I was neither wounded nor killed by any rodentia, but seriously? Affix the faucet properly, people!

The room, while small, did have a lovely little kitchenette…

Elements kitchenette

So cute and stylized! Very New York. Upon first look the tile looked awesome! Totally in and stylish. But by the end of my stay I had already grown bored with the look of the glass tiles.

Elements kitchenette tile

It’s an important thing to consider…how stylized and “in” do you want your more permanent fixtures to be? Seeing this kitchenette was a lesson in erring on the side of classic for me. Make your more stylized pieces the things that are easy to change. Unless you have a lot of money to make frequent updates or a husband who likes to replace tile annually. I have neither. Lol.

All in all, it was a great stay in New York. Made me appreciate all of the space I have at home. While I do feel like I could downsize and get rid of a lot of stuff and square footage, I don’t know that I’m quite ready to move into a studio apartment!

slumber party

21 May 2013 by Andrea Leave a Comment

You know I love numbers and letters. I just love the look of vintage zinc letters, but of course don’t like the price. Or waiting to find the perfect font or the perfect combination of letters to create the word I want.

So I decided to make my own. Let’s go faux!

My bedroom has a giant vaulted ceiling behind my bed that acts as the focal point in the room. Sort of. Not much to focus on. In fact, it’s…

bedroom nonfocal wall

 Please ignore the unmade bed. This pic is originally from a post about messiness.

I decided to come up with a word appropriate for the bedroom. So what are you supposed to do in a bedroom? Um, no, not that. Geez. Get your mind out of the gutter. The other thing. Yes, that’s right. Sleep. Catch some Zs. Rest. Slumber.

Slumber…a calming word. Perfect and peaceful.

slumber 3

What do you think? Doesn’t it look awesome? I just love it!

slumber 5

The letters look perfectly metallic!

slumber 1

Can you believe that they’re just paper-mache letters that you can get from Michael’s or Joann for a couple of bucks a pop? To be honest, this project, like most others, has cured for a couple of months, so the receipt has escaped me. But rest assured that I used a 50% off coupon and/or got these letters on sale. So including paint, definitely less than $25 spent for an awesome wall hanging that has now turned my bedroom wall into a focal wall!

Here’s how I did it.

Cleared off only enough of my craft table to fit this project, because that’s just how I roll. Perhaps you might enjoy having a fully cleared craft area, but that’s your call.

Took some paper-mache letters…

 slumber 13


Painted a base coat using black craft paint…

slumber 12


Let them dry. Took a nap. Seriously. This project is perfect for a lazy Saturday afternoon.

Using a small piece of a rag, did a dry rub of a silver metallic paint over the black paint, being sure to smooth and buff out any visible lines in the paint. When the rag got too saturated with paint, I cut and used a fresh piece of rag.

slumber 11


Rubbing on the paint…

slumber 9


How the letters looked after one coat of silver metallic paint…

slumber 10


One coat wasn’t quite enough because there was still too much black showing through and the paint still had lines and looked “painted.”

Took another nap while the second coat dried. When it was completely dry, I used 3M velcro picture hanging strips to adhere the letters to the wall.

slumber 6

Yes, in fact, I was standing on my bed when I took this photo, precariously balanced as I hung the letters!

As for placement on the wall, I just eyeballed it. I’m just kind of cool that way. I also like to hang and rehang things due to the eyeball method, but this one turned out pretty well. One time was all I needed. But you could go all out and take some measurements if you want to just be accurate and do things once.

I love how the drop cap “S” sits down in the crook of the headboard a bit…

slumber 4

Overall, a successful project, wouldn’t you say?


the perfect little kitchen

8 March 2013 by Andrea Leave a Comment

If I bought a small house – and I’d like to – this would be the perfect small, functional kitchen…

perfect kitchen

Sorry for the glare and the torn-from-a-magazine tatters. But isn’t it awesome?


keeping it real :: basement edition

2 February 2013 by Andrea Leave a Comment

We interrupt our regularly scheduled project programming due to this…

photo 8

Yes that is my basement and yes that is water.

Let’s travel back in time for a moment to Tuesday and Wednesday of this week when it was 60 degrees in central Ohio. And to Wednesday when we had torrential rains all. day. long.

Fast forward to Thursday evening at dinner, when my 12-year-old said, “Oh by the way, I heard this really loud banging noise before you got home. I wasn’t sure if it was outside or in the basement, but I looked outside and didn’t see anything.”

Rather than jump up immediately – perhaps having a sense of impending doom – I calmly finished my delicious homemade dinner of sauteed chicken and broccoli.

After dinner, I started down the basement stairs, cell phone in hand. To be honest, I was thinking more along the lines that someone has kicked in my basement window and was waiting down there to kill me slowly, which really wasn’t likely, considering we have glass block windows.

Imagine my surprise when what I found was my basement floor covered with water.

Um hello?!! We have a sump pump!!! Isn’t that supposed to prevent that kind of thing from happening?

Turns out that the sump pump conveniently stopped working.

Here’s the good news. I didn’t panic. I calmly called Brad the Plumber and he agreed to come over on Friday. And then I stood there for about 20 minutes and hatched my clean-up plan.

Brad told me not to worry about cleaning up on Thursday, because if the sump pump wasn’t working, there could be more water. Fortunately, most things, like my Christmas ornaments, are in plastic bins…

photo 5

And my awesome Ikea couch in our tornado lounge is on metal legs…

photo 3

Most of the cardboard boxes were empty just waiting to be thrown anyway, which I took care of yesterday. And of course the rugs needed to be tossed.

And what was that loud banging sound my son heard? It was my artificial Christmas tree, which was in a cardboard box standing upright, which fell to the floor once the cardboard was too wet. You can see it here, waiting for my next steps, which will likely be dragging it upstairs to air out (meaning that I will have to put up a Christmas tree in February when I can barely get through December).

photo 4

It’s now Saturday morning, the sump pump has been replaced, much of the clean up has happened, and the water has mostly receded.

Lessons learned?

Store your crap in plastic for the love of Pete!

These pics were saved because they were in a plastic bin rather than directly on the floor or in cardboard…

photo 7

This piece of Ikea furniture that I left in it’s cardboard packaging and haven’t put together may be ruined…

photo 6

Don’t assume your mechanicals will always work.

Sump pumps and other mechanicals will eventually stop working. Usually when you need them most.

Get rid of crap you don’t need.

Honestly, I’ve been avoiding my basement for a while. This mini-deluge was actually just what I needed to get off my ass and clean it up down there. Next time I shouldn’t wait so long (but honestly, I probably will, because as you already know if you read this blog, I’m generally a lazy human being).

I’m going to donate any holiday decorations that I don’t use anymore, knowing that I’m just not the kind of person who goes all out on holiday decor.

The kids’ crappy art table will be going as well. No one uses it anymore. Ditto for toys that are no longer in use.

Same goes for decorator items that I’m not currently using. They need to go. No saving for decorating emergencies!

Don’t panic!

Seriously, don’t panic. There’s not a lot aside from illness and loss of life that can’t be fixed. In fact, I was really proud of how well I handled this whole ordeal. I didn’t have the extra time or money to spend on a flooded basement, but I didn’t have a choice in the matter so I handled it to the best of my ability. There’s still more clean up to be done, but I’m getting to it little by little.

I’m glad I don’t have a finished basement

I’ve always been pretty neutral about finished basements. Our house is big enough that I don’t feel that we need to finish the basement for the extra living space. We mostly use it for storage and as a place to run and hide when there’s a tornado warning. Plus the kids will occasionally venture down there to play foosball or air hockey. As of Thursday, I’m relieved it’s not a finished basement. That would have been a much bigger mess.

And last, but certainly not least…

Make sure your ex-husband gets his crap out of your basement

In the spirit of keeping the peace, I haven’t made a big deal out of my ex-husband still having some stuff in my basement. In fact quite a bit of stuff. Even though yesterday it was 3 years to the day that he moved out! And in fact, this is his stuff on the shelves…

photo

…while much of my stuff is on the floor. Getting wet. So that crap ends this weekend. His belongings are leaving my house this weekend. Do I sound bitter? Perhaps a bit, since I’m spending my time and energy cleaning up after his crap. ‘Nuff said.

Now that I’ve been doing all of this basement clean up, I’m excited to spruce up our tornado lounge a bit, since this is where we spend our time when the tornado sirens are blaring. Project pics coming soon!

almost instant art

27 January 2013 by Andrea Leave a Comment

DSCN0541 cover

If you’re short on art around your place there are ways to create almost instant (and cheap) art.

I work in advertising, so we frequently get giant catalogs of different types of royalty-free images that places like ad agencies purchase. Like this one…

photo4

These catalogs frequently land in the trash or recycling so I snagged this one and found this awesomeness…

photo 1

…which I decided definitely needs to be hanging on my wall, so I cut it out of the book and framed it in a $4 floating poster frame and got this…

DSCN0541

Sorry about the glare…I have lots of windows.

Isn’t she awesome? For this kind of project an inexpensive floating poster frame is usually your best bet because a) it’s cheap, and b) the art likely won’t be standard size. This was 7 1/2″ x 9″ so a floating frame was ideal. Plus the paper very likely isn’t acid-free, so it probably won’t last forever, but then you can feel good about changing things up when you get bored, because you only spent $4!

Doesn’t she look fabulous here on the small wall between my linen closet door and my bedroom door?

DSCN0519

Accompanied by some other whimsical pieces…this folk art snake I created on a scrap of wood, using paint, buttons, and decoupaged ransom note letters cut out from a magazine…

DSCN0517

And this multi-media, silk-screened and quilted art piece by Janice Taylor…

DSCN0521

But don’t worry if you don’t have access to books of royalty-free art. If you have a graphic designer friend, ask them if they ever get them and would be willing to pass them on to you. Or buy a cheap second-hand coffee table book to cut up and frame. (And don’t feel guilty about cutting up a book! I know how these things go, and we need to get over that. Think of giving it new life that you can enjoy every day!)

Another inexpensive option is to clip magazine ads. There are some beautiful ones and again, they may not last forever, but for now they’d make great little art pieces. Here are a couple that I’ve saved over the years with the intent to frame…

DSCN0525

DSCN0526

DSCN0527

DSCN0530

Or you could even frame an interesting piece of wrapping paper like this…

DSCN0531

…or a sheet of artsy scrapbook paper…

photo

So there’s no excuse for you to not have any gorgeous art on your walls! Now go frame something!

Showing off at Funky Junk Interiors.

C39PFCJYH6S5

finally figured it out

26 January 2013 by Andrea Leave a Comment

The other day when my sister and I were sitting around in my bedroom like it was our job, I finally figured out what’s wrong with my bedroom. Aside from needing to be painted something other than beigiest beige.

It doesn’t match the style of my house.

It was a total EUREKA! I have found it! moment. I was completely excited as I explained my rationale to my sister. She, being the kind, yet sarcastic person that she is, handled it all well and without too much boredom or irritation.

See, the problem is that it has a vaulted ceiling with all kinds of funky off-center angles and whatnot…

bdrm 1

…which is a very contemporary look, yet the style of the house is more traditional. It’s always bothered me and I finally put my finger on the problem after a mere 6.5 years.

bdrm 3

Um yeah, I am taking these pictures from my bed. Don’t be a hater! It’s Saturday morning!

Needless to say, I was dancing around with joy, trying to explain all of this to my sister. She was OK with my explanation, but I didn’t think she was understanding the seriousness of this discovery. I mean this is right up there with gravity, the New World, and the human genome project.

One thing she did understand and agree with me wholeheartedly is my opinion on plant ledges. They’re stupid. Giant dust collectors. Only look good in model homes with a set of 3 giant vases (pronounced “VAH-zez”).

bdrm 2

All of this angled, vaulted, plant-ledged goodness in a lame attempt for the builder to make the room seem bigger – soaring ceilings, decorative spaces – when the room is plenty big and most people just want to cozy bedroom anyway. A tray ceiling would have been a better option, or maybe even just a plain old flat ceiling.

So my answer is to paint not just the walls (gray), but also the ceiling. Of course this kind of thinking gives people angst. When I mentioned it to my teenage daugther, she shouted “No!” My sister was more diplomatic and suggested that perhaps I paint the walls first to see how I like the color.

Phooey. Go big or go home! (I’m already home, but you know what I mean.)

Anyway, I think that painting the ceiling will give the room a more cohesive look – tie it all together. With so many angles, crown molding would look odd, plus it would accentuate the contrast of styles (contemporary vs traditional) and not in the good, throw-in-something-funky-when-you’re-decorating way.

And the white ceiling is so vast and “soaring,” I’m concerned that it would still be the focus of the room…

bdrm 6

Now, I must admit that I am slightly concerned that the room will be too dark and that I might lie in bed, look up, and feel like my coffin lid is closing down on me, but the room has plenty of light, so it should be OK. Plus the single color should help to play down all of the many overly dramatic angles.

Notice this…

bdrm 4

…that’s where Estelle is going to live…

Estelle

And notice this…

bdrm 5

…no, your eyes do not deceive you. That is, indeed, a smoke detector place approximately 12 feet off the ground for easy battery upkeep. And let me assure you that said smoke detector never started chirping during daylight hours. Last time it was 11pm on a school night that had me running to the grocery store for batteries. I’m sure it’s probably placed so high based on some building code, but I also have to point out that it’s the perfect placement in the event that someone bursts into flames while attending to the plant ledge.

featured by jani franck

20 January 2013 by Andrea Leave a Comment

I’m so excited to be featured over at Jani Franck’s blog in a fun and unique format – a doodle interview. Jani doodled the questions and I doodled the answers. Totally creative and probably the most fun interview I’ve ever done! Check it out here.

And to those of you visiting from Jani’s blog, thank you for stopping by and…

office 12

Welcome! Please poke around the blog and hope enjoy all of my misadventures in decorating!


making it my own

20 January 2013 by Andrea Leave a Comment

After living in my current house for 6 1/2 years, I finally opened that one last box. You know, the one that lingers and may actually move from house to house without ever being opened. Well, I figured it had cured quite long enough.

It contained some family photos. In our old house we had lots of places for tchotchkes and framed pics, whereas not so much in the new house. The reason I finally opened it is because I’m working on a picture wall, a project that is currently on hold due a surprising worldwide shortage of small black frames.

Anyway, also in the box were some other pics in frames that I decided to place in what was my ex-husband’s office and is now just an unused room that I’ve been having a bit of trouble making feel like part of my space. Guess it’s the old juju and the manly wood built-in desk and all. But it seems that the addition of the pics and their whimsical frames has finally tipped the scales toward making the room feel more inviting.

The fun blue frame was a handpainted gift from a dear artist friend when my daughter was born and it filled in this space perfectly and added a more funky, personal touch…

office 1

Perfect eclectic frame to capture a photo of such a spirited child…


office 2

And I love these photo booth shots of my cousin Joan, a fabulous jewelry designer, and I from years ago!

office 3

And by sprinkling the whimsical, light-colored frames throughout the wood shelves, it adds the warmth needed to pull all of the other fun elements together…

office 4

…like the snow globes and the rubber ducky collection…

office 6

A pic of my boy when he was a baby amongst all of my favorite books…

office 7

And one of my baby girl who’s not such a baby anymore…

office 9

More whimsy…

office 8

An ostrich created by my late uncle who was an iron worker by trade, and clearly an artist by avocation…

office 10

And a print by artist Janice Taylor over at Our Lady of Weight Loss…

office 11

And finally a vintage pic of me, mostly because I like the frame, but to remind me of who I was when I was a kid, a free and easy creative spirit…

office 5

Now the room is finally beginning to feel like it’s a reflection of the new me.


Showing off at Funky Junk Interiors.

fix your bed

19 January 2013 by Andrea Leave a Comment

When I was growing up, fixing my bed was mandatory. Every. single. day.

Being a natural-born slob, I fell out of that habit once I didn’t have anyone telling me what to do. But now that I’m on a quest to beautify my home on a very slim budget, I started thinking about some of the things that I can do on the cheap, or even for free. Like…

photo 1…fixing my bed!

For those of you who are naturally tidy, I’m sure you’re sitting there reading this saying, “Duh!” but for some of us this is going to be a huge revelation.

So today I decided to get back into the habit of fixing my bed. I know someone who always says, “It only takes 2 minutes to fix your bed.” But not being the type to believe everything I hear, of course I had to time it.

Two minutes and 24 seconds. And I’m sure that the extra 24 seconds was because I spent a little extra time fixing the pillow cases and fluffing the pillows, which wouldn’t need to be done if the pillows hadn’t been stuffed and piled on the side of the bed for who knows how long.

photo 2

So basically the two-minute rule is true. Look how much better everything looks! And really, who can’t spare 2 extra minutes out of your morning routine? Even though I’m tempted to say that I can’t, we all know that on most days we can spare the 2 minutes.

Most of all, it will make your room so much more beautiful and your bed so much nicer to retire to every evening.

Francois the sock monkey thinks so…

photo 3

« Previous Page
Next Page »
  • Email
  • Facebook
  • Instagram
  • Pinterest
  • Twitter

subscribe, baby!

Homage Style on Twitter
Homage Style on Facebook
Pin me! Homage Style on Pinterest

archives

WORK IN PROGRESS...

work in progress :: rose painting

FAVORITE PROJECTS...

the tornado lounge

another glorious chalkboard project

freshening up the family room

industrial chic curtains

angsty teen boy's room

almost instant art

vintage cowboy room

Copyright © 2025 · Beautiful Pro Theme on Genesis Framework · WordPress · Log in