homage style

when your home is your canvas

schedule a design consult
  • blog
  • services
    • styling & decorating
    • home staging
    • virtual home staging
  • featured
  • about
  • workshops
  • contact
  • subscribe

spinning a yarn

28 December 2011 by Andrea Leave a Comment

In the office of my home there is a large and boring wall that’s been crying out for help for some time now.

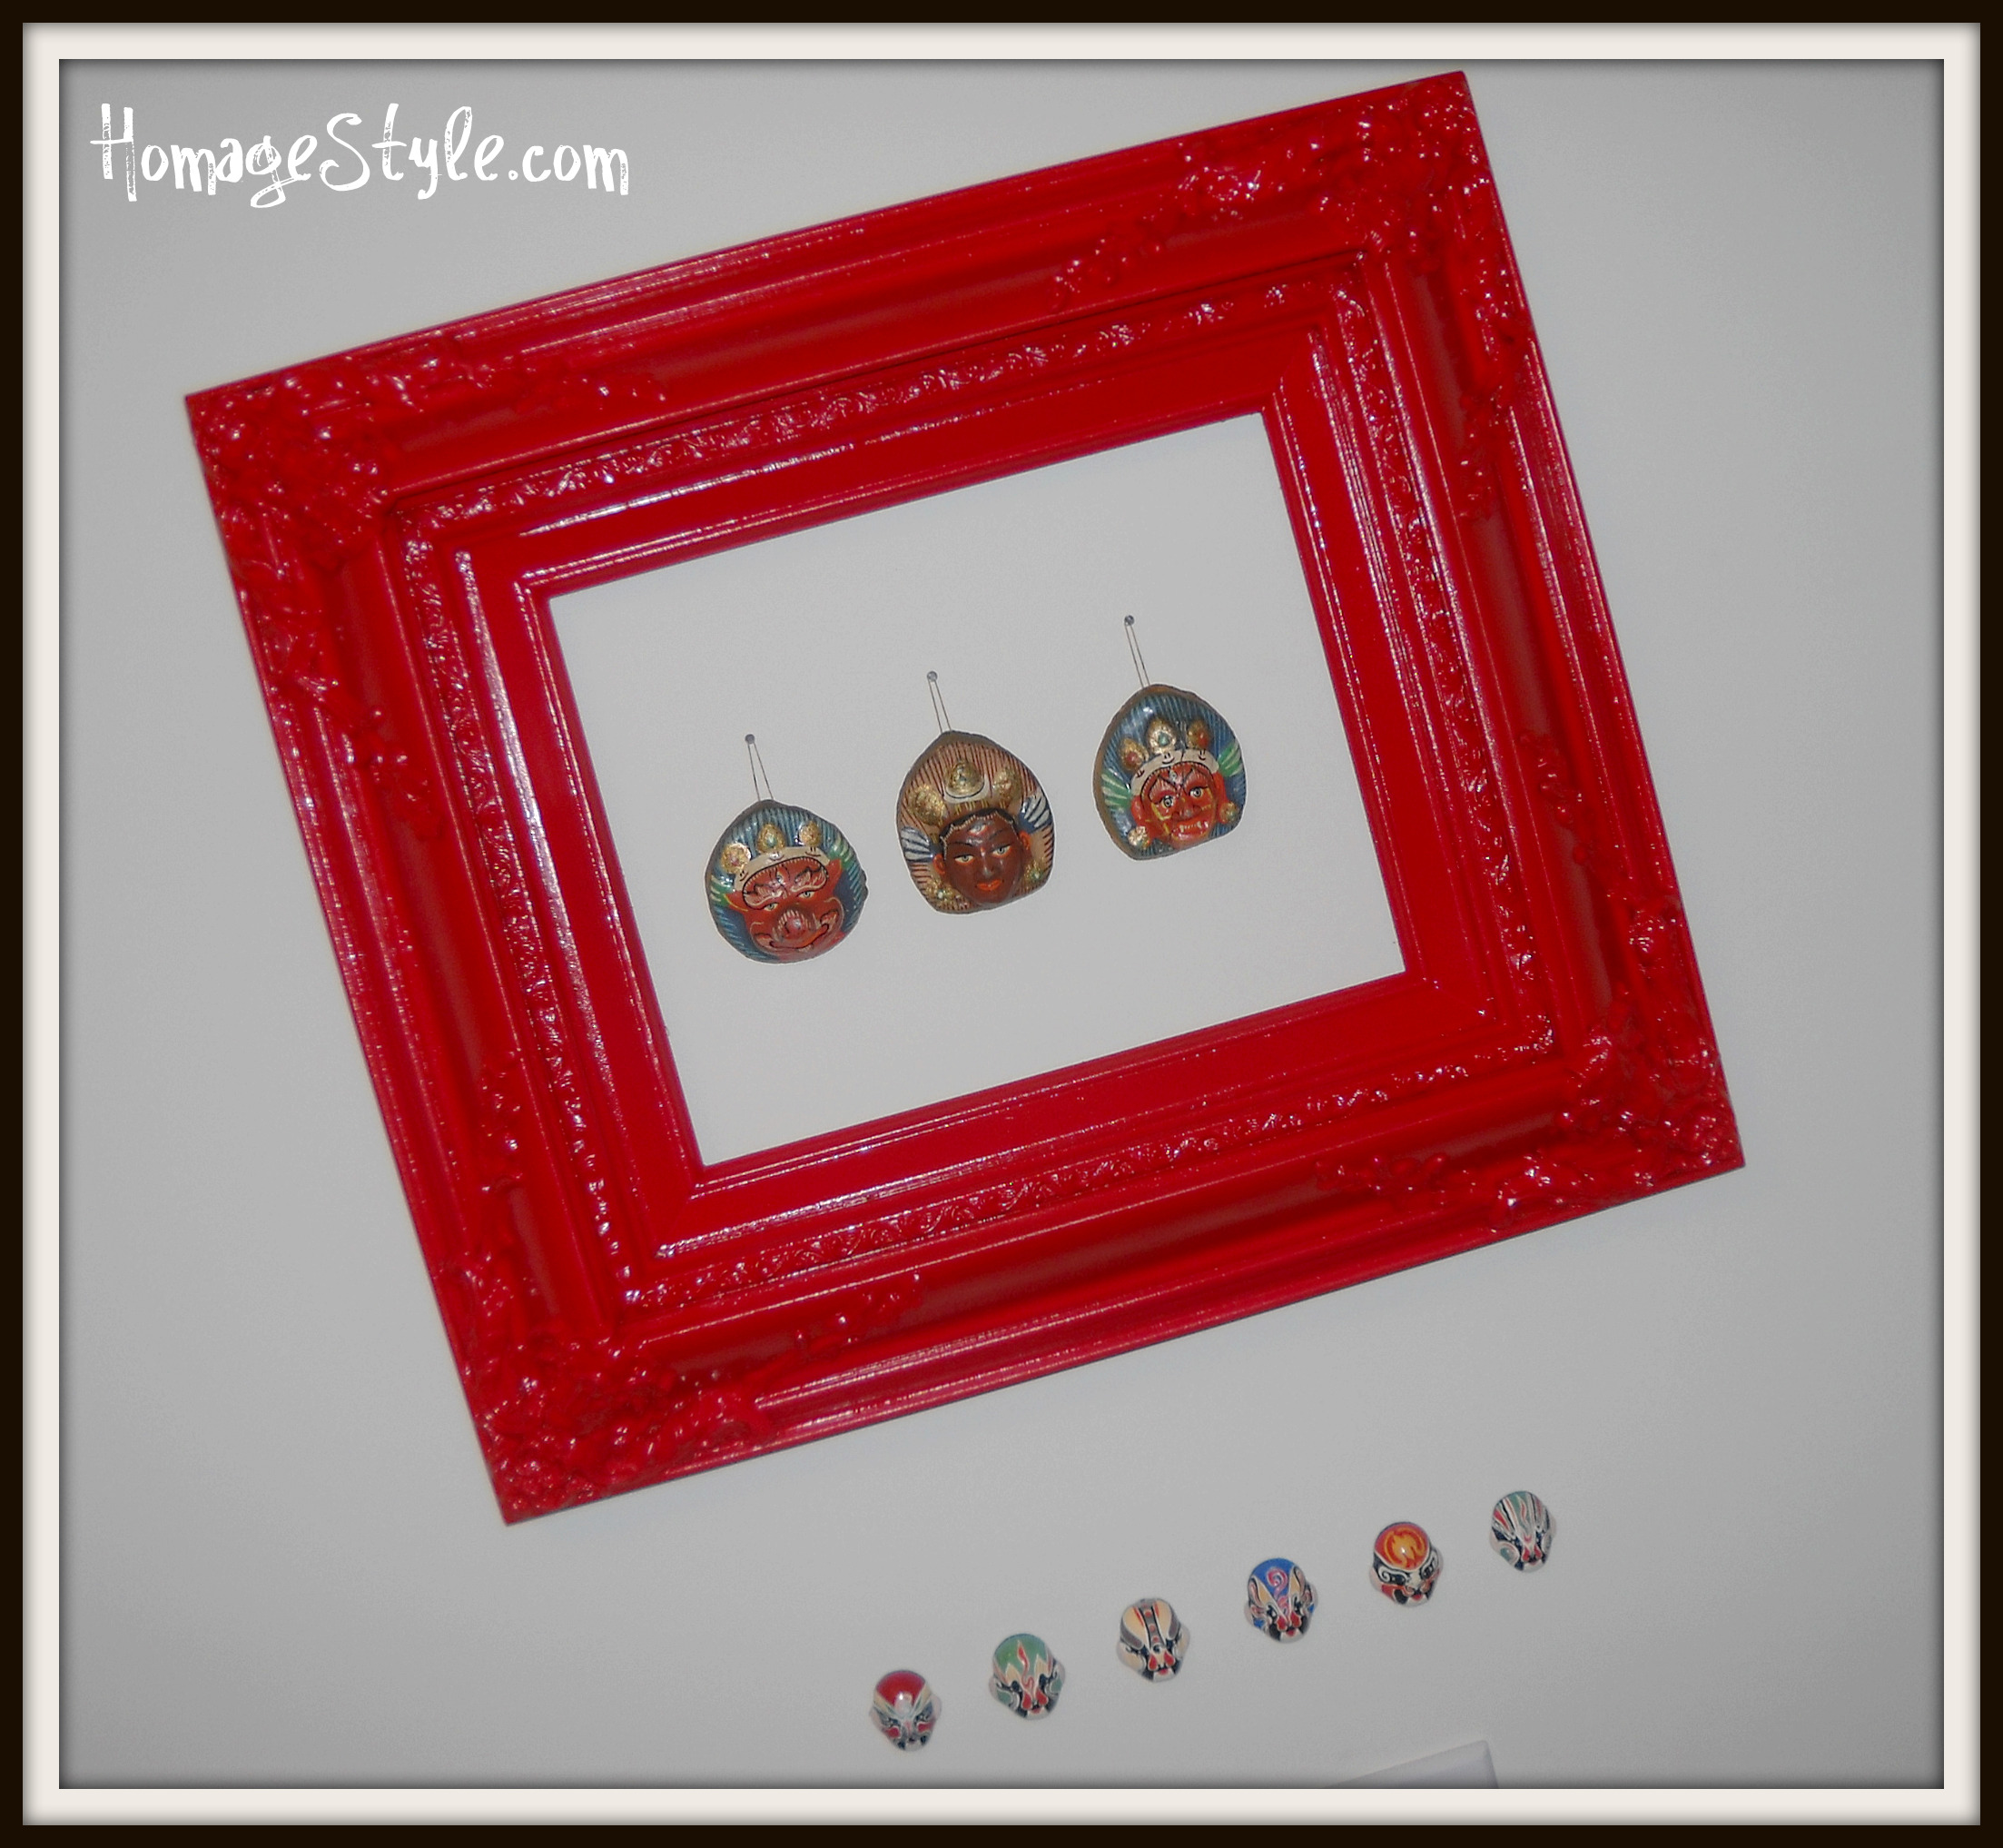
It really needs some paint, but that’s not happening this week. I already started to give the wall a bit of flair with this fabulous frame…

…but there’s still a lot of wall left.

So I decided to spin a yarn.  Or at least use a skein of yarn to create a wall hanging.  Here’s the yarn…

It’s some seriously gorgeous yarn, and I wish that I could knit a throw with it, but I don’t have enough and it seems that they’re not making it any more. So a wall hanging it is.

This was a really quick & easy project. I used embroidery stretcher bars that I already had at home. They are pretty inexpensive – a couple of bucks each at your local craft store.

I tied the yarn around the stretcher bar…

…and started wrapping the yarn haphazardly around the stretcher bars…

…and when I was just about out of yarn, I knotted the end of the yarn around the stretcher bar…

And that’s all it took to create this…

I love it!  Adds some color, texture, and visual interest to an otherwise boring wall!

And cheap to boot!  While this project was free to me, since I had everything sitting around at home, if you had to go out to buy the pieces and parts, you could probably make this for between $10-$15.  Not bad! Perfect for decorating on a tight budget.

This project even won the seal of approval from my 11-year-old son, who said it’s “really cool!” Can’t beat that!

coming soon…

20 October 2011 by Andrea Leave a Comment

Coming soon to a trash-picked ottoman near you…

20111020-220623.jpg

funky zebra table

5 September 2011 by Andrea 2 Comments

Out of the ruins of my daughter’s room came a damaged occasional table…

…the top was ruined with nail polish and who knows what else…ew!

Because the surface was damaged and the laminate was peeled in a couple of places, I was ready to simply throw it out, which didn’t thrill me, because without that table, other pieces of furniture would eventually be used for the very activities that ruined this one.

After thinking on it for a day, I remembered the zebra print Duck brand duct tape my ex-husband gave to me. Eureka! I could cover the tabletop with zebra print duct tape!

(If you don’t have an ex-husband giving you gifts of duct tape, you can get some at Target for about $5.)

Simply apply the tape to the tabletop, slightly overlapping each row of tape.

In less than an hour, the table was repaired, and better than ever!

Isn’t it adorable?

And easy as pie! (Well, actually way easier than pie, since I don’t find pie to be all that easy…)


There may be other pieces in my daughter’s room that may get the duct tape treatment! Stay tuned as the Great Clean Up continues…

vintage gym baskets

8 July 2011 by Andrea Leave a Comment

A while back I bought 3 vintage gym baskets from EveryEskimo a seller on Etsy, who has great vintage treasures.

I’ve always liked the cool look of vintage gym baskets, even though I wasn’t much of an athlete back in school…I class-clowned my way through gym class!

They weren’t particularly inexpensive – in fact they were costly – but I was very attached to these because they were from Republic Steel in Canton, Ohio.

I come from a long line of steelworkers, several of whom worked for Republic Steel in the Massillon-Canton area, and I didn’t know if I’d ever come across gym baskets with a personal connection again, so I sprang for them.

This project cured for at least a year, but I knew what I wanted to do with these the whole time.  My goal was to hang these in the kids’ bathroom to store towels & toilet paper.

So I drilled a couple of holes in my newly painted bathroom wall…a risk for sure, just in case this project didn’t work as planned, since I was ruining a perfectly painted wall. (In case you’re not familiar with various literary devices, this, my friends, is foreshadowing.)

Apparently there are absolutely no studs in my bathroom wall, or at least none where I needed them, so I used anchors to attach the screws and washers that would attach the basket to the wall.

FAIL.

Every time I’d tighten the screw close enough to hold the basket to the wall, the anchor would pull out from the wall. Plus, if I left enough room between the baskets to actually reach in & get the towels or TP out of the basket, the top basket would be at average adult eye level.  Perfect for hitting heads and knocking already not secured baskets out of the wall.

PROJECT FAIL.

Yeah, so that was a disappointment after curing and planning for a solid year.

Back to the drawing board.  I patched the newly painted wall (so sad) and I brainstormed.

Since the baskets are just shy of 12″ x 12″, I realized that what I needed was a stackable cube-type system, and I could use the baskets as the drawers.  So I ran out to Target and bought this ClosetMaid 3-shelf stackable organizer…

I put it together & voila!  A viable solution…

It’s not an ideal solution for a couple of reasons, but it will do the trick for now.  First, the middle shelves are adjustable, so they move when I pull the drawers out.  And the baskets fit pretty tightly and will eventually mark up the white laminate.  But for $20, I solved the problem and got the vintage gym baskets out of curing mode and into action.

Maybe someday I’ll go all Ana White on you guys and make my own cube shelving system.  But until then, this works.

(Keeping it real with the toilet brush in the pic!)

Showing off at Funky Junk Interiors Saturday Night Special and Remodelaholic link parties and…


and…

lookee what i found!

10 June 2011 by Andrea 1 Comment

Lookee what I found on Craigslist for 30 clams!


A beautiful chandelier that I’m going to paint and put in my bedroom.  (That is after it “cures” for a while in my garage with my other projects-in-waiting.)

Can’t decide…white, black or other?

Don’t want it to be too shabby chic.  We’ll see…

Edited to add: My friend Claire says silver.  BRILLIANT!  Silver shall be.  (After adequate curing time, of course.)

lookie what i found

16 January 2011 by Andrea 14 Comments

A while back, I found this in the trash in my neighborhood…

It was a sweet gift from the decorating gods, because I had recently seen what Donna over at Funky Junk Interiors had done with a mattress spring, and I wanted to try my hand at decorating with one.

Well, don’t know if you know this about me yet, but usually I allow my finds to “cure” for a while.  The mattress spring was no different.  It sat in my garage awaiting inspiration for a solid 6 months!

Then this weekend, inspiration struck, when I found this fun piece at Bed, Bath & Beyond…

I love vintage advertising style and I have a standard poodle, so there was no walking away from this one.  Plus I had a $5 off coupon, so it was a done deal for about $15.

But before I bought it, I did ask myself where I would put it, because I don’t buy anything new for the house if I don’t think I have a place for it.

Then I remembered this section of the wall…

…that has been begging for something for a long time.  I had thought about putting the mattress spring there, but it needed a little something.

A little something like the poodle print.

So I hung the mattress spring, making sure it was level…

…with a couple of screws in anchors.

To make the shiny silver screws less obvious against the rusty mattress spring, I just colored them with a brown Sharpie marker.

Then I placed the canvas where I wanted it, hung it with a nail in the wall, through the open area in the spring, and voila!

The perfect frame for a fun print!

I just love it!  Isn’t it adorable?  Decorating with found objects is great fun!

Linking up here…

WhisperWood Cottage Funky Junk's Saturday Nite Special

Update…exciting news!  This project was featured on Whisperwood Cottage!

WhisperWood Cottage

thanksgiving table

27 November 2010 by Andrea 4 Comments

This Thanksgiving I hosted the Thanksgiving dinner and had a total of 11 guests.  Not a huge production, but certainly more than my usual 3 person deal.

As always, I wanted to create a special tablescape, but using things that I have around the house.  Plus, this year, in addition to making it budget friendly, I wanted it to reflect the more austere times that we and many families are experiencing.  Not too sparse, but nothing extravagant either.  So, I went with a combination that I frequently rely on…shabby chic with a touch of whimsical & mod.

As promised, I used the same tablecloth as last year and the year before.  And no, I didn’t iron it…I’m not that kind of girl!  Besides, that’s part of the “shabby”!

I mixed 2 sets of dishes and tied the dinner and salad plates in fun ribbons that I’ve had since forever…

The ribbon takes care of the whimsical…

…and the mod…

The delicate blue glasses are vintage – they were my mom’s from before I was born.

The “centerpiece” is comprised of repurposed Classico pasta sauce jars, filled with a tealight and topped with ribbon, further contributing to the shabby chicness…

But best of all were the family we were blessed to have joining us at this table…

Here’s wishing all of you a warm and wonderful holiday season, filled with the love and laughter of family and friends!

twig decor

8 November 2010 by Andrea 1 Comment

A great low-cost decorating trick is to use twigs & branches that you can gather up on a walk in your neighborhood.  Imagine that – decorating as exercise!  That’s my kind of workout!

I picked up the large branch in this vignette after a windy fall day in our neighborhood…

The birch branch above our entertainment center holds some sentimental value for me, since I cut it from the lovely birch tree in front of our old house in California, because I wanted to take a part of that home with me.  Now it adorns our family room and I can see it every day.

With 2-story walls, the birch branch serves more than just a sentimental purpose. It also “caps” the vignette on the entertainment center, and grounds the whole thing, otherwise your eye would go all the way up to the ceiling, where there’s not a whole lot to see, aside from an occasional dust web.

And hey…don’t be too jealous of my Sauder entertainment center!  I keep fantasizing about replacing it, but a replacement entertainment center never seems to make it to the top of my grocery list!  Maybe some day a beautiful piece will find me when I’m out garage sailing or dumpster diving!

Don’t forget that you can also create a tablescape using twigs & branches.  This was from a past Thanksgiving, when I spray painted some gnarled roots & branches for a free but lovely holiday table display.

OK, I probably should have ironed the tablecloth before creating the tablescape, but it was all about the juxtaposition of sophisticated mod and rustic!

So don’t think you have to spend big bucks to adorn your home…just take a walk on the wild side and bring some nature indoors!

Showing off my twigs & branches at the sticks, twigs & branches link party over at Funky Junk Interiors.

benched

23 October 2010 by Andrea 4 Comments

Because I live in a land where backpacks, purses, viola, suitcase-sized-5th-grade-zipper-binder-almost-as-large-as-said-5th-grader, and other various & sundry items litter the kitchen table and the bar stools and the breakfast bar, I need some sort of storage solution.

We do have a coat closet with a shelf for each person, however, that is MILES away from the kitchen table! Well, probably only 12-20 steps away, depending on your size, but it sure seems like miles!

So, when blogger Ruth from A Trip to Holland came up with a backpack storage solution I was inspired, but still a little stumped.

Then I remembered the butcher block style grocery display counter tops that I have had sitting in my garage for a couple of years.

Got them for free from the grocery where my ex-husband works, and I’ve been contemplating how to use them for a couple of years.  Finally figured something out.

So, I purchased 4 legs & metal brackets to attach the legs…

First I drilled some pilot holes.  I marked the drill bit with tape to ensure that I didn’t drill through the wood.

Then screwed in the metal brackets…

Then I stained the legs…

When the stain was dry, I screwed the legs into the brackets, and voila!

A great looking place for all of that after school miscellany!

The only drawback with this project was that it wasn’t as cheap as I thought it would be.  The butcher block was free, but the legs were $4.88 each, and the brackets were $2.95 each, plus the stain was $4.95.  So it ended up costing around $36, which is more than I would have preferred to spend.

But it’s adorable, isn’t it?

I’m showing off this great bench at Funky Junk Interiors.

Funky Junk's Saturday Nite Special

when you said to frame it, is this what you meant?

17 August 2010 by Andrea 1 Comment

Recently, a dear friend who lives in New York came to visit me in Ohio.

After his visit, because I have a collection of masks like this…

And this…

He sent me these…

He suggested that I frame them, which I thought was a wonderful idea.  So I purchased this framed painting from a second hand store…

I paid $7.50 for it, which is more than I usually pay for something like this.  Free is usually more my price range, but I was motivated and had an idea of exactly what I wanted to do, and this was the perfect frame.  And although the painting was cute in a kitschy kind of way and very tempting to keep, I popped the painting out of the frame and began prepping to paint the frame.

So, it went from this…

To this, which resembles something from a bloody horror flick…

To this, which turned out to be cute & funky, adding a pop of color & fun to a classic office…

A close up of the detail on the frame…

What room in your home could use a shot of color & fun?

Showing off this project at Funky Junk Interiors…

Funky Junk's Sat Nite Special

« Previous Page
Next Page »
  • Email
  • Facebook
  • Instagram
  • Pinterest
  • Twitter

subscribe, baby!

Homage Style on Twitter
Homage Style on Facebook
Pin me! Homage Style on Pinterest

archives

WORK IN PROGRESS...

work in progress :: rose painting

FAVORITE PROJECTS...

the tornado lounge

another glorious chalkboard project

freshening up the family room

industrial chic curtains

angsty teen boy's room

almost instant art

vintage cowboy room

Copyright © 2025 · Beautiful Pro Theme on Genesis Framework · WordPress · Log in