homage style

when your home is your canvas

schedule a design consult
  • blog
  • services
    • styling & decorating
    • home staging
    • virtual home staging
  • featured
  • about
  • workshops
  • contact
  • subscribe

little things :: empty frame edition :: part deux

19 November 2012 by Andrea Leave a Comment

OK, so I know it’s been a while since I’ve posted a project, and now all of a sudden I’ve had a burst of creativity with 2 projects in 2 days.

Why?

Most likely because I’m avoiding cleaning my house, since I’m hosting Thanksgiving dinner in a mere 4 days. There’s nothing like it to inspire projects!

But mostly, I haven’t been doing much because I haven’t had the funds for new purchases. But then I began to tidy up a bit and found a little frame that I’ve been meaning to use for years.

I wasn’t back in cleaning mode not even for 5 minutes after hanging the little frame when I saw the same gorgeous frame that’s been leaning against my desk for probably several years, also waiting for real home, where it would be loved and cherished as it deserves. (Yes, my office/studio is like the land of the misfit toys.)

Don’t mind the crappy photos…it’s late and my iPhone is tired.

And I thought, “Damn it, after all these years, this frame deserves a real home…where could I put it?” Which sent me on a wild goose chase through my house trying to find a place for this awesome frame, while I conveniently avoided cleaning.

With this crappy quality closeup photo, you may or may not be able to see that the frame has lovely rosettes and a layered look with gold metallic topped with a creamy off-white paint.

I found this bad boy at Michael’s for a mere $13. It was originally all gold metallic, but I spruced it up with an antique white finish. Then I let it cure for a couple of years. 

Since the frame is a little bit ornate and a little bit shabby chic (sung to the tune of Donny & Marie’s Little Bit Country, Little Bit Rock ‘N Roll. And yes, you’re welcome for ensuring that tune that will be in your head all day long), I figured I might find a place in my master bedroom, which is full of shabby chic awesomeness.

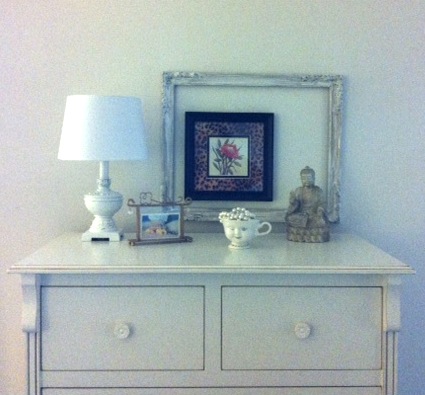
I stopped dead in my tracks when I got here…

The heavens parted and the angels were singing, until the record scratched when I realized that this spot, while a clever vignette, was missing a little something. Something along the lines of an ornate, yet shabby chic empty frame…


The heavens once again beamed down upon me and the angels resumed their singing. It was the perfect addition to top off this vignette. And because I’m getting comfortable with imperfection, I LOVE the off-center look! It makes it unusual and a bit mod.

(However, don’t ask my 12-year-old-son for his opinion…he walked into my room and shouted, “THAT FRAME IS OFF CENTER. YOU NEED TO FIX THAT!” To which I said, “No, I’m getting comfortable with imperfection.” His response was to turn on his heel and run screaming from my room. If I’d known it would have had that effect, I might have tried it years ago!)

So now that I’ve got that project wrapped up, it’s back to my pre-Thanksgiving attempts at cleaning. Let’s see how many more awesome projects are spawned by my avoidant behaviors.

road trip!

12 September 2012 by Andrea 1 Comment

We’re going on a Road Trip!

Road Trip! is when I leave my humble abode and take it on the road to someone else’s place to share their decorating savvy.

So let’s Road Trip! to my friend Brandi’s home.

This is Brandi…she’s lots of fun!

Brandi & the Most Interesting Man in the World (I’m sure she’s going to love that I used this pic!)

About a year and a half ago, Brandi bought her first home – an awesome 70s condo. I’ve been sharing unsolicited decorating ideas ever since!

Last winter, Brandi and I were lamenting about her really long living room wall.

I asked Brandi if she’d consider a stencil. Brandi liked the idea and before you know it, the stencil was ordered and work started (Brandi’s a real doer…once she decides on an idea, she moves on it. No curing for her. I like that in a person. Except for me.) There was even a Sunday evening visit from me to help with this awesome project.

Taping the stencil…

The first section complete!

So far, so good!

I’m not going to show the whole project…let’s cut to the finished product…

Doesn’t it look fabulous? I love it! I especially love how it honors the era in which the condo was built. The rug adds a perfect pop of Brandi’s accent colors. And don’t you love the TV stand? Brandi’s dad made it with a pattern from Ana White.

Another angle…

The stenciled pattern really gave definition to what was otherwise a boring wall. Good work, Brandi!

A couple of vignettes by the TV…

Brandi loves all things beachy, and it’s a subtle theme throughout her home, like these shells in a vase…

Let’s travel upstairs to take a sneak peak at Brandi’s bedroom. But first check out this terrific 70s light fixture…

Thankfully Brandi agreed that the 70s light needs to stay. Super mod! The art is by Brandi’s teenage daughter, Madison.

Brandi’s bedroom is still a work in progress, but I couldn’t resist sharing some unique features, like this print, which totally makes me smile…

…framed in this awesome gaudy gold frame…

Then there’s her new shabby chic mermaid lamp on her newly repainted nightstand…

With some fabulous tchotckes from her recent vacation to Florida, like this lobster matchbox…

..and a clock…

…that has a compass on the back…

What a unique piece!

And finally, some art photos that Brandi recently added…

…displaying the calming colors of the sea that Brandi loves…

That’s the end of our Road Trip! today, but I’m sure there will be another trip to Brandi’s, especially after all of the great projects we chatting about today! More to come…

little things :: recorder edition

5 September 2012 by Andrea Leave a Comment

If you have kids or ever were a kid, I’m betting that you have an old recorder lying around. Didn’t everyone play recorder in school? I know I did, my sister did, and both of my kids did.

And I’m guessing that you also have some weird little strip of wall that is too small for just about anything decorative. Well, guess again, people!

Dig up that old recorder make it sing again!

No, you don’t have to play Lightly Row…just find an awkward spot and hang that recorder up, just like this…

It’s just a tiny little speck of wall between two door frames. Perfect for a recorder! Don’t you think?

How much did it cost? $0, since I had not one but two recorders hanging around. And if you want to get all funky and colorful, you could spend about $5 and get one of these…

Now go play Lightly Row while you’re looking for a place to hang your recorder!

how much did it cost? family room edition

28 August 2012 by Andrea Leave a Comment

Recently I freshened up our family room.

It looks great, but how much did it cost?

Let me give you the facts and figures…

  • Zebra ottoman – trash picked the ottoman, pre-owned spray paint, zebra print fabric – $12
  • Pier 1 zebra print throws – 2 x $29.99 – $59.98
  • Fab tulip decorative pillow cover from The Cottage Cupboard – $45.95 + $6 shipping – $51.95*
  • Upcycled vintage sheet turned RELAX pillow cover from Olive Handmade – $29 + $2.75 shipping – $31.75*
  • Number 5 pillow, a recycled sail pillow from Reiter8 – $48 + $9 shipping – $57*
  • 2 green & yellow candles from Pier 1 – 2 x $4.18 – $8.36
  • 1 yellow candle & 1 orange candle – 2 x $7.99 – $15.98

GRAND TOTAL – $237.02

While $237 is no small chunk of change, especially to the broke among us, it’s not such a terrible price to pay to give a complete facelift to my old, boring family room. And best of all, it looks awesome!

*I will note that I spent more on the pillow covers and number 5 pillow than I usually spend. Typically I’m more of a clearance shopper. These were not small purchases. But I decided that I wanted unique, durable accessories and that I want to begin to support artisans, crafters, and artists with my dollars when I can.


choosing an accent color

26 August 2012 by Andrea Leave a Comment

Recently I freshened up my family room by adding some simple accessories and not spending scads of money. My new accent colors are orange, yellow, and a vibrant green.

I chose those colors by taking a look at some of the accessories I already had in the room (that I knew I’d be keeping) and picking out some of the more vibrant colors, like the orange and yellow in this lamp shade (which has a great story behind it)…

The spicy pumpkin orange and greens in this chair…

The golden lamp…

The yellow in this vintage advertising art…

And the vibrant yellow lemon zest in the poodle’s martini…(and what poodle doesn’t deserve – hell, even demand – a martini?)…

All pieces that I already had in my family room that either I love (the art and the striped lampshade) or that need to stay because the lotto fairies didn’t leave me a winning ticket (the 90s chairs). Bottom line…I built an entirely new look based on what I already had with just a couple of colors that are now here…

and here…

Plus, just to keep everyone on their toes with a little design surprise, I didn’t just stick to orange, yellow, and green, but also added in a little zebra and black and white…

…because doesn’t black and white zebra match just about anything? Just shake your head yes and agree with me and no one will get hurt!

See it all pulled together in the family room here.

vintage cowboy room

24 August 2012 by Andrea 2 Comments

Yeehaw! Don’t you love some vintage cowboy? I sure do!

Sadly, my boy is almost a teen and doesn’t want a little boy room anymore. So we’re saying goodbye to the vintage cowboy room. But not before we pay tribute to it here on the ole blog.

Welcome…

But we’ll need to hurry before the boy finds out we’re in his room!

The dresser…

Antler lamp and little cowboy boots…

Snake hook and star…

And an awesome spaghetti western print…

A snake I painted, along with a collection of letter As…

The duvet cover I sewed…

Awesome cowboy fabric! I sewed the curtains too…

I was thrilled to find the arrowhead finials, but they were bronze, so I spray painted them black. Super cool fabric with a western matchbook print. Love it!

The nightstand, with horses and a hammered metal lamp…

I made a French memo board with rodeo fabric…

And one of the focal points of the room is the star hanging on a wagon wheel…

And last but not least, in this day and age no cowboy room would be complete without Woody…

And just like Andy did in Toy Story, my kids wrote my son’s name on the bottom of Woody’s boot. Also like Andy, my boy is growing up, so soon we’ll say goodbye to the vintage cowboy room, but it sure was great while it lasted.

Showing off at Funky Junk Interiors and French Country Cottage.

freshening up the family room

19 August 2012 by Andrea 4 Comments

Recently I did a little refresh on our family room. It used to be all green on leather…

BORING. So I decided to add a touch of mod to the family room. And I created this AWESOME zebra ottoman…

While the ottoman looks AWESOME and is shouting STYLE, the chair is now screaming 90s! And the couches are saying in a monotone voice, dull, dull, dull.

Nothing is really looking very stylish or pulled together. But the chairs and couches aren’t going anywhere anytime soon, so I need to work with what I have. (And apparently neither is the dog, who is not dead, despite how it looks.)

So for a small investment, I added some accessories to change up the look from drab to fab!

I started by adding these faux fur zebra print throws from Pier 1 Imports…

See how the throws make everything look tied together and the ottoman doesn’t stand out like a sore thumb anymore? But the throws aren’t an exact match to the ottoman fabric, so things aren’t looking too matchy-matchy. (And I promise you, the dog is alive and well.)

But something is still missing…throw pillows!

No more boring colors! Some bold oranges and greens on this fab pillow cover from The Cottage Cupboard on Etsy. And a terrific upcycled vintage sheet turned pillow cover from Olive Handmade on Etsy…

Handstamped with RELAX…love it!

Suddenly I’m not thinking 90s when I see the red chair. Same goes for this one…

…after adding the Number 5 pillow, a recycled sail pillow from Reiter8 on Etsy, the red geometric chairs get dialed back to neutral status.

The black and white of the Number 5 pillow ties in with the black and white of the ottoman, making it all work.

A couple more touches of color…

Green candles and other tchotchkes on the mantle…

A new spot for an old Buddha statue that I found in the basement…

A little vignette on a giant old-school stereo speaker…yeah, I still have those.

More pops of color (but please ignore the not-so-fab entertainment center…it’s on the to-be-replaced-when-I-win-the-lotto list)…

The whole shebang (with the not-dead dog still on the couch concerning animal lovers everywhere)…

A definite improvement, don’t you think?

Showing off at Funky Junk Interiors.

*No animals were harmed in the writing of this blog post.

obstacles

8 August 2012 by Andrea Leave a Comment

We all have obstacles to contend with, whether it’s in our design projects or just life in general. It doesn’t matter how experienced you are or how big or small your budget is, you will face obstacles.

I discovered an obstacle the other day when I tried to fix my bed…

Here are some design obstacles that I can think of off the top of my head…

  • Little or no money
  • Project fails
  • Not enough time, due to a job, kids, or other obligations
  • Health concerns
  • Planning an eventual move
  • Lack of consensus on design plan with significant other
  • No inspiration
  • Fear
  • Any combination or all of the above

There are probably countless other obstacles that can prevent one from making a house a home. The question is, do you want to make changes to your home?

If the answer is yes, then the obstacles can be overcome. But on your terms. In your own time.

Don’t feel pressured to be like anyone else.  No one but you truly understands the obstacles you’re facing.  Don’t let those obstacles prevent you from making your creative dreams come true. Sometimes we need to release ourselves from expectations – the way that others think things should be or the timeline they try to impose on you, or even expecting too much of ourselves.

Little or no money

Get resoureceful! I’m not ashamed to have limited funds and you shouldn’t be either! There are plenty of freebies or cheap options out there.

Consider these…

  • Scanning your neighbors’ trash, or as it’s known in trendy design circles – Dumpster Diving! You know the old saw…one man’s trash is another man’s treasure. Put it to good work! One of my favorite pieces is my zebra ottoman, which I pulled out of a neighbor’s trash pile and revamped to fabulousity!
  • Accepting hand-me-downs – Sure your mother-in-law’s chair might be super-frumpy, but recovering it with your fave fabric will make it frumpilicious!
  • Shop Goodwill and other local thrift shops – Never know what you can find!
  • Repurpose to create new things, like I did to make this “plant stand“.
  • And never forget how inexpensive spray paint and wall paint are. Save your pennies and splurge on the paint, which can make the crappiest tchotchke look awesome!

Project fails

All I can say about this is plenty of my projects are failures. I guess that’s how we learn. Don’t know if you’ve noticed, but it seems that a lot more design shows are beginning to share the inner workings of how they put together their designs and how they stage rooms, and many are now also sharing project snafus. That’s refreshing. Because if even the big-time pros with a design staff have an occasional project fail, then why wouldn’t you and I?

My thought on project fails is learn from it and move on.

Not enough time

Yes, we live in a busy, busy world, where sometimes it feels like our lives aren’t our own. A 24/7 place where we’re always connected, companies suck up more and more of our personal lives, kids are overscheduled, and we’re generally encouraged to go, go, go.

I get it. I live it. But somehow we have to steal some time back to make our nests a place of calm respite. To make them a place we love to be. Our favorite place in the whole world.

I don’t know how to tell you how to make that happen, other than to say that we need to get comfy with doing things in small increments of time and maybe not finishing the project today. I am the Grand Pubah of Unfinished Projects, the Queen of Curing, but eventually the important stuff rises to the top of the heap.

Learn to pick the important stuff off the top of the heap. Eventually, your vision will be realized. Besides, design is an always-changing, ever-moving target, right?

Health concerns

There are plenty of people out there, quietly suffering with health issues that can zap their energy and ability to start or finish projects. Even if they have amazing ideas, they may not be able to bring their ideas to life.

If you have a health issue that slows your dreams, just do what you can when you can.  I have struggled with this too, and often wonder if I’ll ever get my old energy levels back.  Perhaps not.  But I’m not going to let it stop me.  Does it slow me and my progress down?  For sure.  But I just keep on trucking, sometimes moving at a snail’s pace, but always continuing to dream about my future projects, and I hope you will too.

Planning an eventual move

Yeah, you’re busted. Just because you’re planning to move in 6 months or a year or ten years, doesn’t mean you’re off the hook for feathering your nest.

You have two choices. You can leave your place bland and impersonal because you might be moving eventually, or you can make it into a place that you love, starting today!

Lack of consensus on design plan

It’s called compromise, baby.

No, I don’t mean the kind of compromise that we both decide to like my ideas always. (Although wouldn’t that be awesome?)

If you and your signif other can’t agree on one project, I’m guessing that there are plenty more projects to start on that you do agree on. Move on to something different and come back to this one later. Maybe one or both of you will have a change of heart or your overall vision will change.

If that doesn’t work, there’s always couples counseling.

No inspiration

Can you say Pinterest? With Pinterest and all of the design blogs out there, none of us have any excuse not to get inspired.

Don’t have ideas? Then copy someone else’s and apply them to your space. Eventually, you’ll get inspired with your own ideas or offshoots of others’ ideas. Go for it!

Fear

We’re all afraid to some degree. What if it doesn’t work out? Then you’ll learn from your failure (see Project Fails above) and move on and try again. If you’re really fearful, start small. Something small and inexpensive isn’t going to destroy your world if it goes wrong. But if it goes right, it may just rock your world! So…

Just Do It!

The message here is to do what you can, when you can. Let yourself off the hook if you don’t work at the same pace as others. Forgive yourself and get comfortable with who you are and your obstacles won’t seem like such difficult problems to overcome.  They’ll eventually become part of the terrain that is your life to navigate. Don’t worry, you’ll be great!

A little bird told me…

8 August 2012 by Andrea Leave a Comment

OK, so I lied.

Not a giant lie. More of a lie of omission.

I said I’d never do Twitter.

And apparently I lied. Because now I’m on Twitter. And I love it!

I don’t know why, but I was never able to figure out what all the buzz was all about on Twitter. And what do I have to say in 140 characters? Or other people? And who cares?

Suddenly I discovered some people that I love on Twitter, people that I want to hear from 20 times a day, and now I love Twitter!

So if you want to see what this liar is blathering about 20 times a day, follow me on Twitter!

(Next thing you know I’m gonna be telling you that I love the chevron pattern and bought a pouf! Ok, let’s not get too carried away…)

little things :: switchplate edition

8 July 2012 by Andrea Leave a Comment

Sometimes, it’s the little things that make your place uniquely your home. The little touches that no one else has. Small statement pieces…eye candy!

In the eat-in dining area in our kitchen I kicked up the punch on the switchplates, adding pops of color where you least expect it, using vintage advertising art stickers that I got a while back at the dollar shop at Target.

It was a pretty simple project.  Quick & easy, just how I like my projects!

I unscrewed the switchplate, then applied the stickers in a collage-like fashion.

Using an exacto knife, I cut the stickers over the holes for the switch and screws and folded it under and stuck it to the reverse side of the plate.

For extra protection, I applied a layer of clear contact paper over the stickers and cut and folded the contact paper to the back of the plate as I did with the stickers.

Also, I painted the screw heads with orange and red nail polish to match the stickers so the white of the screws doesn’t blare out.

The vintage advertising stickers were a perfect match for my kitchen with their bold, rich colors, since the cabinets are dark wood with black chalkboard paint, creating a vintage schoolhouse look.

The look was especially good for this switchplate, which was cut by the builder to fit flush against the cabinets. Before it looked kind of tacky, sort of like a switchplate that was cut by the builder due to poor measurements. But now it’s become a miniature art piece.

The little things mean a lot!

Showing off at Funky Junk Interiors.

« Previous Page
Next Page »
  • Email
  • Facebook
  • Instagram
  • Pinterest
  • Twitter

subscribe, baby!

Homage Style on Twitter
Homage Style on Facebook
Pin me! Homage Style on Pinterest

archives

WORK IN PROGRESS...

work in progress :: rose painting

FAVORITE PROJECTS...

the tornado lounge

another glorious chalkboard project

freshening up the family room

industrial chic curtains

angsty teen boy's room

almost instant art

vintage cowboy room

Copyright © 2025 · Beautiful Pro Theme on Genesis Framework · WordPress · Log in